
Many homeowners overlook the value of their older, high-quality appliances simply because they lack smart connectivity. Whether it’s a vintage range or a rugged washer, these devices often outperform modern alternatives in durability, yet remain isolated from the smart home ecosystem. Connecting them isn’t just about convenience — it’s a strategic move to save money, reduce electronic waste, and gain precise control over your energy consumption.
The good news is that most older appliances are built to last — and with the right retrofit tools, you don’t have to choose between reliability and modern intelligence. By retrofitting rather than replacing, you can implement custom schedules and safety triggers that turn your most trusted household tools into smart, energy-efficient assets.
Successfully integrating older appliances requires a disciplined approach that prioritizes electrical safety and data-driven decision-making. Before modifying any equipment, assess compatibility by identifying specific control points — such as mains power or signal lines — and calculating inrush current to prevent hardware failure. This guide covers the technical landscape of smart interfaces, from Zigbee and Z-Wave protocols to heavy-duty relays and smart plugs, and walks you through wiring best practices and local-first automation platforms like Home Assistant — so you can safely transform your older appliances into fully monitored, intelligent components of your modern home.
Why retrofit legacy appliances into your smart home
You likely have durable older appliances that still perform well but lack modern connectivity. Retrofitting them saves money, reduces waste, and gives you measurable control over energy, schedules, and safety. In this article you’ll learn how to assess compatibility, identify control points, and evaluate risks before touching any wiring or firmware — with a data-driven approach to prioritize interventions that deliver the best return on investment and safety outcomes, without unnecessary replacements.
Next you’ll explore how to choose the right smart interface — protocols and hardware — and how to meet wiring and power requirements safely. Practical installation steps cover smart plugs, relays, and retrofit modules, followed by guidance on integrating devices into automation platforms, building reliable workflows, and maintaining secure operation. By the end you’ll have a clear, safe plan to bring your older appliances into your smart home.
Understanding Old Legacy Appliances
Integrating Old legacy appliances into modern systems can enhance their utility and extend their lifespan.
Assessing compatibility, control points, and risk
Before you buy hardware, you need a clear, measured picture of each of your legacy appliances. Good triage saves money and prevents dangerous mistakes.
Map the control points you actually need
Decide what you want to control: simple power on/off, a momentary start/stop, a setpoint (temperature/speed), or variable control (fan speed, dimming). Open the user manual or remove the service panel (power off first) and photograph wiring and labels. Common control targets:
For example, a gas oven with an electronic ignition board may safely tolerate cutting the mains, but switching the ignition control lines directly could permanently damage the board.
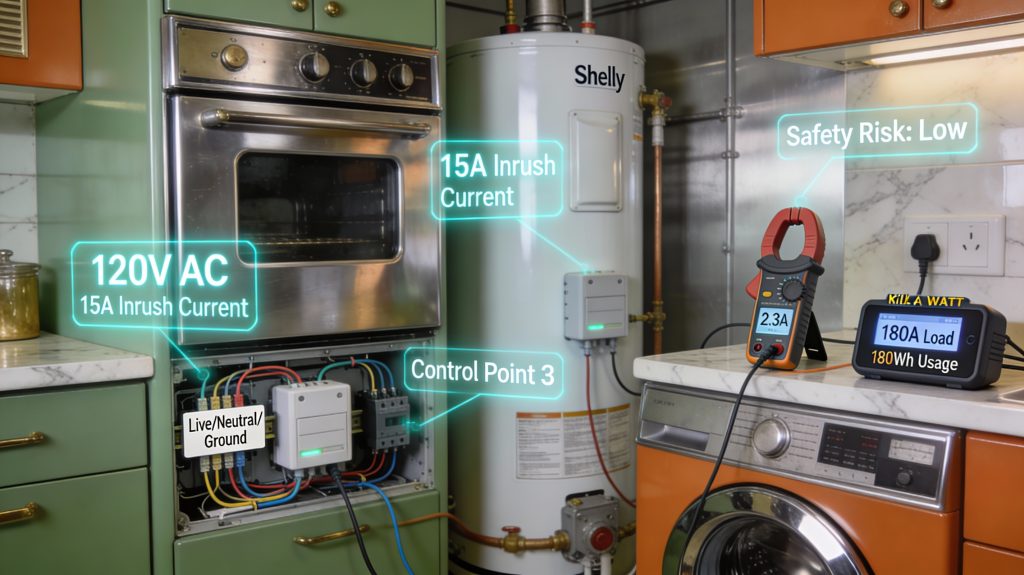
Identify electrical characteristics
Record voltage, steady-state current, and inrush or start-up current from nameplates or datasheets. Use a Kill A Watt for plug-in devices or a clamp meter for hardwired loads — both are essential for accurately measuring motors or compressors that list separate inrush current specs.
Key distinctions:
Rule of thumb: if steady current >15 A or inrush >> steady, avoid basic smart plugs.
Check electronics and environment constraints
Watch for built-in control boards, earth-referenced neutrals, or microcontroller-driven interfaces that can be damaged by switching — all common vulnerabilities in older appliances. Also factor in environmental conditions such as humidity, vibration, dust, and temperature extremes, as these will determine the enclosure IP rating and connector choices you need.
For example, the TP-Link Kasa HS103 (13A) works well for lamps and small resistive loads, while the Shelly 1PM (16A) is a popular choice for in-wall monitoring and simple relay control. Always confirm device ratings against your measured currents before installation.
Use a simple risk matrix to triage
Weigh Safety (electrocution, fire, water damage) × Value (cost to replace) × Complexity (hardwired, inrush). Quick mapping:
If the data shows high current, high inrush, or complex electronics, stop and plan for contactors or professional evaluation. Next, you’ll match these findings to protocol and hardware choices.
Choosing the right smart interface: protocols and hardware
You’ve mapped control points and risks — now pick an interface that matches what you need to do and how your home network behaves. This section turns those measurements into practical choices.
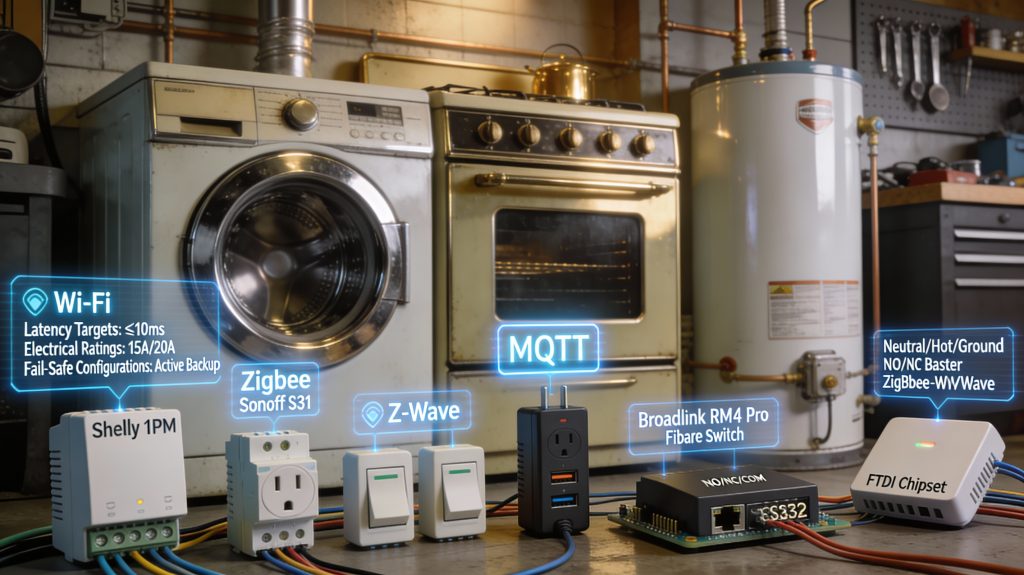
Key interface types and when to use them
Compare connectivity options
Objective selection checklist (do this before you buy)
If you’re retrofitting a garage door or water pump, prioritize low‑latency, fail‑safe relays; if you’re adding many sensors, choose a mesh radio. Next, you’ll translate those hardware choices into safe, code‑compliant wiring and power plans.
Wiring, power requirements, and electrical safety best practices
Retrofitting means working with mains power — get this right or you risk fire, shock, or damaged kit. The guidance below gives the practical checks and safe choices you should use before you touch a terminal.
Understand conductors and neutral requirements
Know your line (hot), neutral, and ground wiring. Many smart switches and modules need a neutral to power their electronics; if the switch box lacks neutral, choose a no‑neutral model or use a retrofit module that sits at the load. Always preserve the ground for safety — don’t rely on conduit as a substitute for a proper earth.
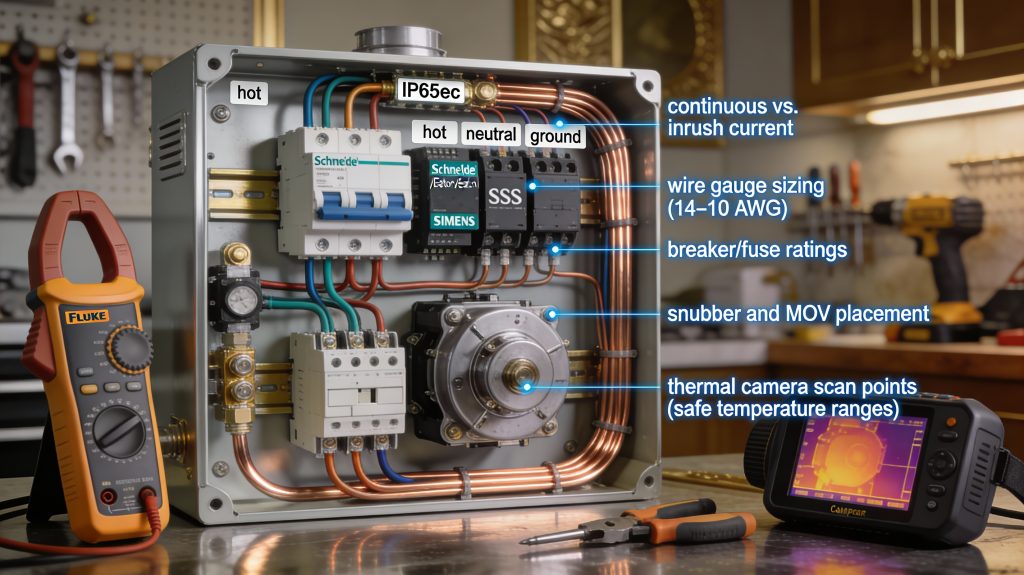
Match ratings: continuous vs. inrush current
Examples: prefer a Schneider/Eaton/Siemens contactor or a motor‑rated relay over a generic PCB relay for a washing machine or compressor. For resistive loads (heaters), SSRs or solid‑state relays with zero‑cross switching are fine; for inductive loads, choose mechanical relays or relay modules explicitly rated for inductive inrush.
Protective devices, wiring, and enclosures
Measure and verify before finishing
When to call an electrician
If you’re unsure about branch circuits, service panels, or load calculations, hire a licensed electrician — it’s a small cost for a large reduction in risk. Next, you’ll put these principles into action with actual devices: smart plugs, relays, and retrofit modules.
Practical installation: smart plugs, relays, and retrofit modules
This section walks you through common retrofit patterns and step‑by‑step checks so your retrofit works reliably and safely in the real world.
Plug‑in devices: pick the right smart plug
For plug‑in items (lamps, kettles, small heaters, fans), choose a smart plug rated above both the appliance’s continuous current and its peak/inrush. Examples:
Place plugs in ventilated areas and avoid tight bundles. Prefer products with energy monitoring (TP‑Link HS110 style or Sonoff POW R2) so you can confirm actual draw during testing.
Hardwired loads: DIN‑rail relays, in‑line relays, and SSRs
Choose device type to match the load:
If you need remote switching with a low profile, consider an industrial in‑line smart relay (Z‑Wave/Aeotec heavy‑duty switch) rated for the application.
IR, serial, and protocol interfaces
For appliances using IR or serial control, use learning IR blasters (BroadLink RM4 Pro) or protocol translators (Global Caché iTach, RS232→IP gateways). Always validate timings, command repetitions, and device state feedback — a living‑room AV AVR will ignore a single mis‑timed IR burst.
Practical installation checklist and testing
Next up: once the hardware is behaving, you’ll integrate these control points into automation rules and platform workflows.
Integrating with automation platforms and workflows
Once the hardware is behaving, the next step is plumbing it into a control plane that’s resilient, observable, and safe. Treat integration as software engineering: prefer local-first, test thoroughly, and instrument everything.
Choose a local-first platform and stack
You’ll get lower latency and fewer surprises if automations run locally.
Connect devices: MQTT, REST, or native integrations
Pick the protocol that gives you state feedback and control verification.
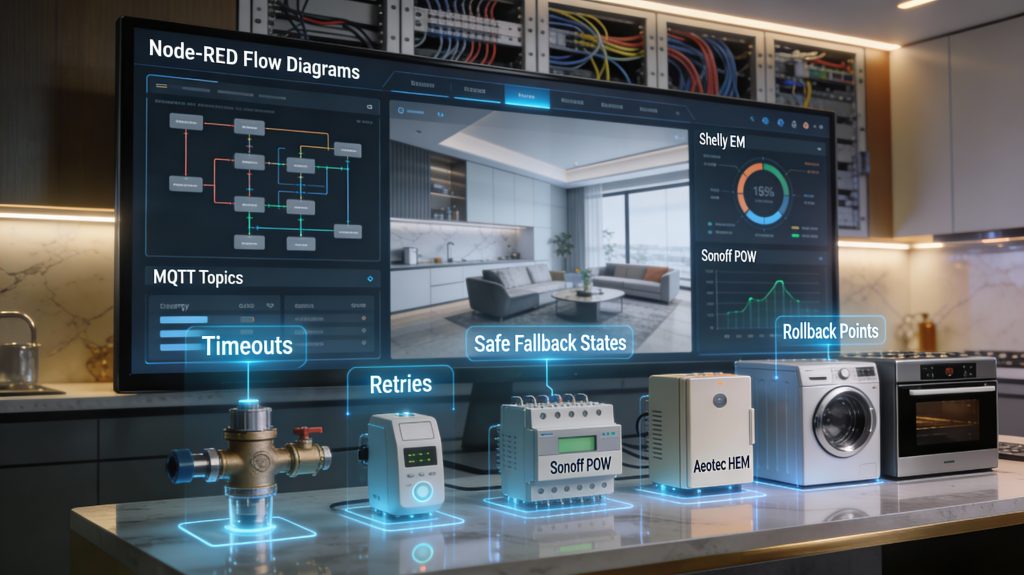
Design automations with explicit failure handling
Make every automation resilient and safe by design.
Instrumentation: logs and metrics you can act on
Measure to improve reliability.
Test, simulate failures, and keep a rollback plan
You’re shipping in a live home — test like you mean it.
Security, maintenance, monitoring, and troubleshooting
Once your retrofits are installed and automated, protecting privacy and safety becomes the priority. Treat these devices as parts of a safety-critical system, not toys.
Harden the network and access
Segment IoT on its own VLAN or SSID and block lateral access to your primary LAN. Use a modern router or controller (Ubiquiti UniFi, MikroTik, or your firewall) to enforce VLANs and firewall rules.
Monitor baselines and alert on anomalies
You can’t secure what you don’t measure. Establish baseline metrics (idle power, typical online/offline patterns, command success rates) and trigger alerts when behavior deviates.
Maintain regularly and keep fallbacks
Schedule routine checks and keep spares so you can restore manual control quickly.
Troubleshoot systematically
Follow a repeatable workflow so you don’t chase ghosts.
Treat maintenance as continuous and data-driven — it’s how you catch slow degradation before it becomes a hazard, then move on to planning small, safe expansions in the Conclusion.
Start small, measure results, and prioritize safety
You can extend the life of your legacy appliances, gain convenience, and capture energy insights by approaching retrofits methodically. Start with low-risk pilot projects on noncritical appliances, collect runtime, power, and reliability data, then evaluate results against your safety and privacy criteria. Let the measurements guide what to scale and what to abandon.
If wiring, load characteristics, or local code are unclear, consult a licensed electrician or appliance technician before modifying anything — the modest fee far outweighs the risks of fire, shock, or voided warranties. Prioritize safety over novelty, iterate based on data, and deploy only solutions you can confidently maintain long term.
How to Clean a Robot Vacuum : A 20 minute Guide5 Smart Home Automation Tips Made Simple