Your robot vacuum is the unsung hero of the modern home — tirelessly patrolling your floors to keep dust and pet hair at bay. But because these devices operate close to the ground, they are constantly exposed to fine debris that can quickly clog delicate internal components. Without regular maintenance, even the most advanced model will suffer from diminished suction, shortened battery life, and frustrating navigation errors. This guide walks you through a simple, practical cleaning routine to keep your device running at its best for years to come.
Learning how to clean a robot vacuum properly is one of the simplest ways to extend its lifespan and keep it performing at its best. Whether you own a budget-friendly model or a premium smart device, the cleaning process remains largely the same — and it takes far less time than most homeowners expect.
Maintaining your robot vacuum doesn’t require a degree in engineering, but it does require a consistent, proactive approach. From basic filter hygiene to deep-cleaning the sensors and drive wheels, this guide covers every aspect of upkeep you need to keep your device running at peak condition. Investing just a few minutes each week into these simple maintenance tasks can extend its lifespan, improve your home’s air quality, and ensure your floors stay spotless for years to come.
You rely on your robot vacuum to keep floors tidy with minimal effort, but routine maintenance is what keeps it performing that way. Clean filters and brushes preserve suction and battery life, reduce allergens, and cut repair costs — while neglect leads to clogged filters, tangled brushes, stuck wheels, shorter runtimes, and navigation errors.
This guide walks you through a practical maintenance routine covering everything from emptying the dustbin and cleaning filters, to servicing brushes, inspecting wheels, and cleaning sensors. Expect quick upkeep after each run and deeper tasks on a weekly or monthly basis — small, consistent efforts that deliver measurable, lasting results.
1
Prepare Safely: Tools, Workspace, and Precautions
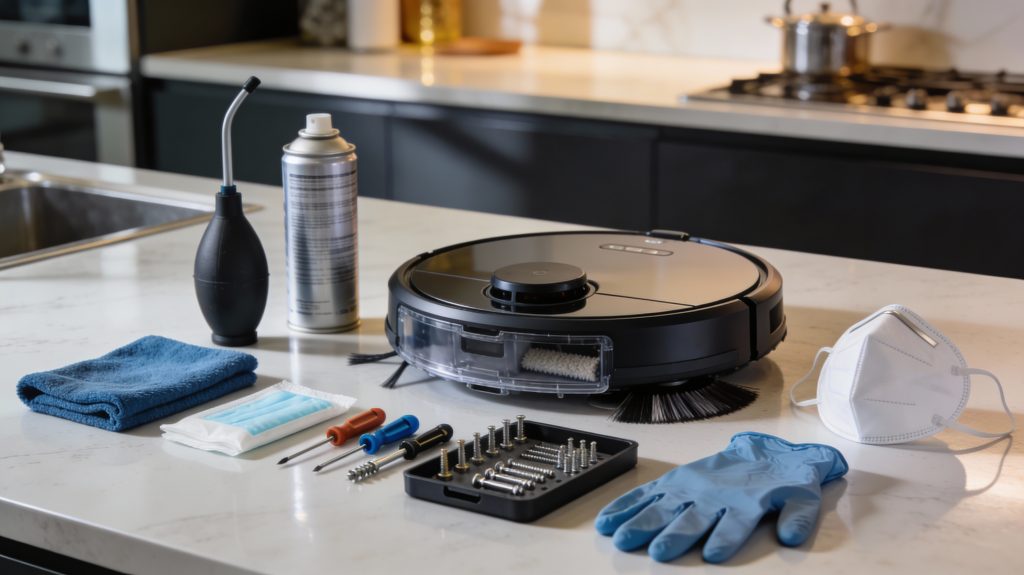
Preparing a high-end robot vacuum for safe maintenance in a clean, organized, and luxurious workspace.
Tools checklist
Gather these before you begin so you don’t interrupt the job midway. Substitutes are fine — focus on soft, non-abrasive tools and manufacturer-recommended replacements.
Compressed air can (e.g., Dust-Off) or a soft electronics brush
Several microfiber cloths (e.g., OXO Good Grips or similar)
Mild detergent or isopropyl alcohol wipes (70%) for non-porous parts
Small screwdriver set (Phillips #0/#1 and a Torx set such as T6/T8)
Small container or magnetic tray for screws and tiny parts
Nitrile gloves and a dust mask if you are sensitive to allergens
Workspace setup
Work on a hard, well-lit surface (kitchen counter, workshop bench, or table). Carpet makes small parts roll and hide; a towel or silicone mat helps contain debris. Good lighting prevents missed dust around sensor windows or brush bearings.
Step-by-step pre-cleaning actions
Follow these steps in sequence to reduce risk.
Power off the robot and remove it from the dock; unplug the dock if needed.
Remove the dustbin and any detachable brushes or rollers so you can access areas safely.
Place screws and small parts in your container immediately when removed.
Refer to your owner’s manual for any model-specific battery-disconnect instructions before touching internal components.
Short risk assessment and precautions
Common mistakes cause most damage. Be mindful of these risks and how to avoid them.
Water ingress: never spray liquids directly; apply a damp cloth and avoid ports and PCB areas.
Battery hazards: don’t open sealed battery compartments unless the manual instructs; disconnect only as directed.
Electrostatic discharge: avoid cleaning on carpet; touch a grounded metal surface first if you’ll handle circuit boards.
Lost parts: use a magnetic tray or labeled containers to keep track of screws and clips.
With your tools organized and workspace prepared, you’re ready to move into the practical cleaning steps. Power off your vacuum and remove it from the dock before you begin — this is the safest and most efficient way to start any cleaning or maintenance routine.
2
Empty and Clean the Dustbin and Filter System of your robot vacuum
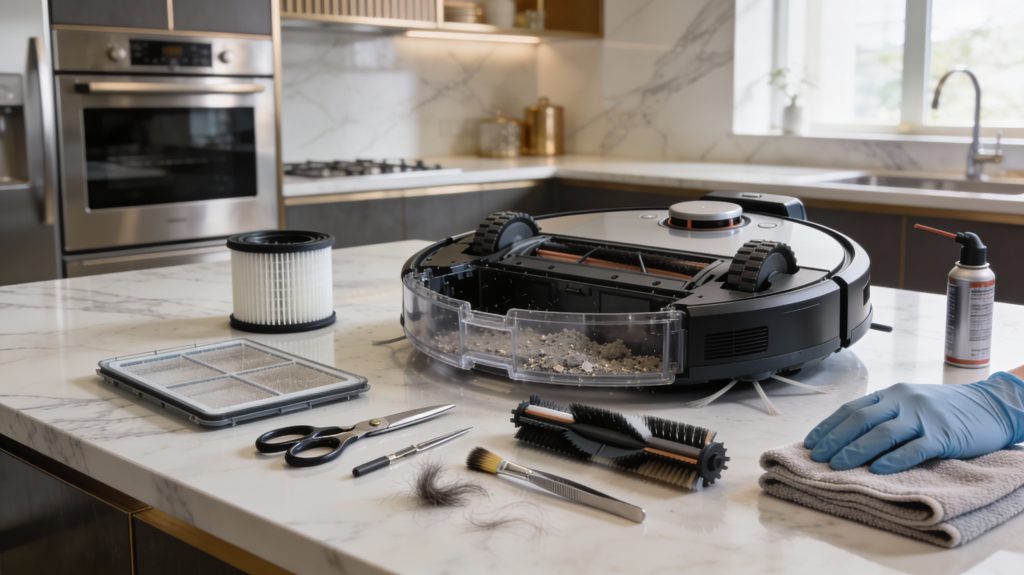
Cleaning and maintaining a high-end robot vacuum in a luxurious, organized kitchen workspace.
The dustbin and filters determine how much debris your robot captures and how well suction and air quality are maintained. Empty the dustbin after every run and perform a deeper clean weekly.
Remove and empty the dustbin (no dust cloud)
Power off the robot and remove the dustbin per your manual (e.g., Roomba, Roborock models all have a front- or top-release bin).
Wear a mask and nitrile gloves if you’re allergy-prone.
Hold the bin over a trash can or outdoor trash bag, close to the opening to avoid dispersal.
Open the hatch and gently tap the bin’s sides to loosen compacted debris; use a soft brush or the hose/crevice tool of an upright vacuum to capture remaining dust.
For very fine dust, empty outside or into a sealed bag and discard immediately.
Identify filter type in your manual. Typical examples: iRobot “High-Efficiency” filters are disposable HEPA-style; some Roborock pre-filters are washable sponge elements.
Washable filters: rinse under lukewarm running water until water runs clear; do not use soap unless manufacturer permits. Squeeze gently, do not wring. Air-dry completely (24 hours minimum) on a rack—never reinstall damp or use heat/hairdryers.
Disposable/HEPA filters: tap gently to remove loose dust (do this outdoors). Do not wash unless explicitly allowed—washing typically damages HEPA media. Replace every 2–6 months depending on use: closer to 2 months for homes with pets or smokers, up to 6 months in low-dust environments.
Inspect seals, gaskets, and fit
Check bin edges, rubber gaskets, and the filter seating for cracks, hardening, or compressed material that prevents a good seal. Even small leaks reduce capture efficiency.
Replace worn seals or cracked bin housings per the manufacturer’s part numbers.
Measure and document filter performance
If you have a differential pressure gauge/manometer, record baseline pressure drop across a clean filter. A sustained rise of ~20–30% over baseline typically indicates significant clogging and replacement.
Log dates of cleaning/replacement, runtime hours, pet presence, and observed suction drop—this trend record will tell you when to replace parts proactively.
With the dustbin and filter system refreshed and documented, you’re ready to move on to the mechanical elements—brushes, rollers, and brush bearings—where hair and fibers commonly hide.
3
Clean Brushes, Rollers, and Brush Bearings
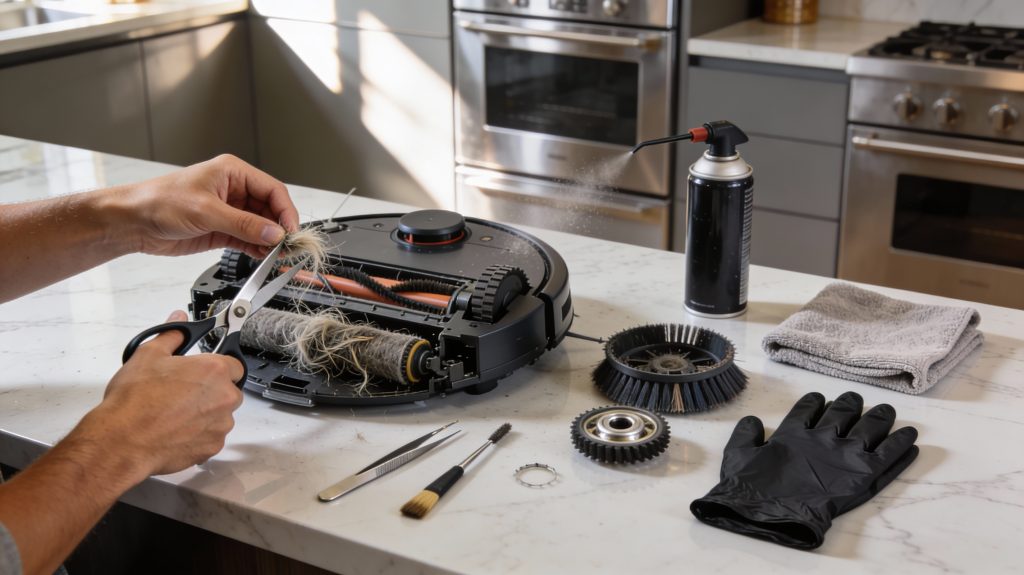
Detailed cleaning and maintenance of robot vacuum brushes and rollers in a premium home kitchen.
Brushes and rollers are the parts where hair, fibers, and grit accumulate fastest—when they bind they reduce pickup and can overload motors. This step-by-step routine helps you remove tangles, inspect wear, and restore smooth rotation.
Step-by-step cleaning routine (10–20 minutes)
Power off and remove each brush per your manual (main roller, side brushes).
Use scissors or a seam ripper to cut hair wrapped around the roller shaft and brush bearings; pull away gently with tweezers.
Use a soft brush (toothbrush or small paintbrush) and canned compressed air to clear inside brush housings and channels.
Remove brush end caps/bearings (if user-removable) and pull out trapped fibers; clean bearings with a dry cloth.
Reassemble and spin rollers by hand to check for smooth rotation before reinstalling.
Estimated time: side brush each 1–2 minutes; main roller, 5–10 minutes; bearings/housings, 3–5 minutes. Total 10–20 minutes for most models (iRobot Roomba 600/900 series, Roborock S5/S7, Neato Botvac).
What to inspect and when to replace
Look for these visual and performance cues:
Bristles: replace if frayed, splayed, or shortened by ~30% (you’ll notice uneven cleaning or streaks).
Roller surface: replace if rubber is cracked, grooved, or no longer makes consistent contact across the floor.
Bearings/axles: replace or service if you feel gritty resistance, wobble, or hear grinding.
Side brushes: replace if more than one arm is deformed or if the brush fails to sweep debris into the intake.
A small real-world test: if vacuuming the same patch twice yields visibly more debris the second time, the brushes are likely compromised.
Prevent re-tangling and prolong life
Pre-brush pet hair-prone zones with a sweep or use a broom before runs.
Consider models with rubber extractors (e.g., iRobot AeroForce-style) which tangle less than bristle rollers.
Use aftermarket hair traps or brush guards where compatible.
Lubricate non-electrical metal axles sparingly with a manufacturer-approved lubricant (check your manual)—avoid oil on rubber components.
Addressing tangles regularly transforms a 20-minute chore into months of better performance.
4
Inspect and Clean Wheels, Suspension, and Charging Contacts
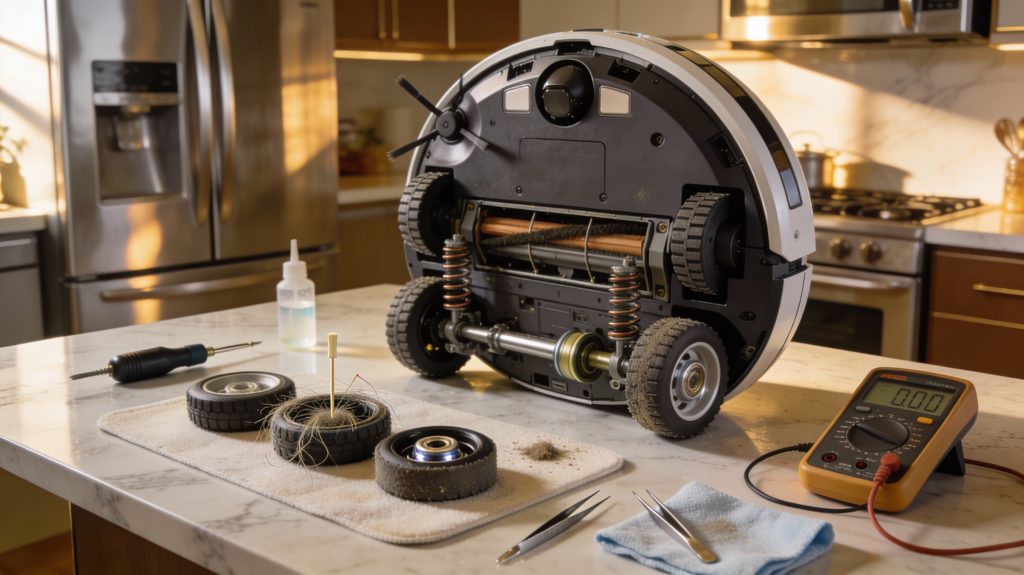
Detailed inspection and cleaning of robot vacuum wheels, suspension, and charging contacts in a premium home environment.
Mobility issues and docking failures often start at the wheels or charging contacts. The steps below help you isolate and fix those silent performance killers so your robot moves freely and reliably returns to dock.
Remove debris from wheels and wheel wells (5–15 minutes)
Power off and flip your robot onto a soft surface; remove the battery if removable.
Remove the castor wheel assembly (many models like Roomba 600/900 or Roborock S-series have a snap-out hub).
Pry out trapped hair, threads, and grit with tweezers or a toothpick; use canned air to blow out fine dust.
Wipe wheel treads and axles with a lint-free cloth dampened with 70% isopropyl alcohol.
Reinstall and spin each wheel by hand — it should rotate smoothly without wobble or grinding.
Check suspension, bearings, and wheel alignment
Visually inspect suspension springs and rubber bumpers for flattening, cracks, or debris jams.
Lift each drive wheel: press the robot’s “move” command (or gently spin wheel by hand) and ensure bearings rotate freely; gritty resistance or noise indicates worn bearings.
Place the robot on a level floor and confirm all wheels make even contact; uneven contact causes drift and poor navigation.
Clean charging contacts and inspect for corrosion
With power off, wipe the dock’s and robot’s charging pads/contact pins using a lint-free cloth lightly moistened with isopropyl alcohol (70%+).
Look for green/white corrosion, pitting, or raised plating — even small pits increase resistance and heat.
If corrosion is present, gently abrade with a pencil eraser or 600-grit sandpaper; re-clean and test.
Simple diagnostic tests
Mobility test: place robot on a flat mat, run a short manual drive; if it pulls to one side, repeat wheel cleaning and swap wheels (left/right) to isolate motor vs. wheel fault.
Charging test with a multimeter: measure DC voltage at the dock contacts while dock is powered — most consumer docks output roughly 14–20 V DC (check your manual).
Continuity check: with no power, measure resistance across robot contact circuit; near-zero ohms or low single-digit ohms is typical — very high resistance suggests a bad contact.
Maintenance intervals (recommended)
Quick castor/wheel clean: weekly if you have pets; otherwise biweekly.
Full wheel/suspension inspection: every 3 months.
Contact deep-clean and multimeter check: every 6–12 months or if docking issues arise.
5
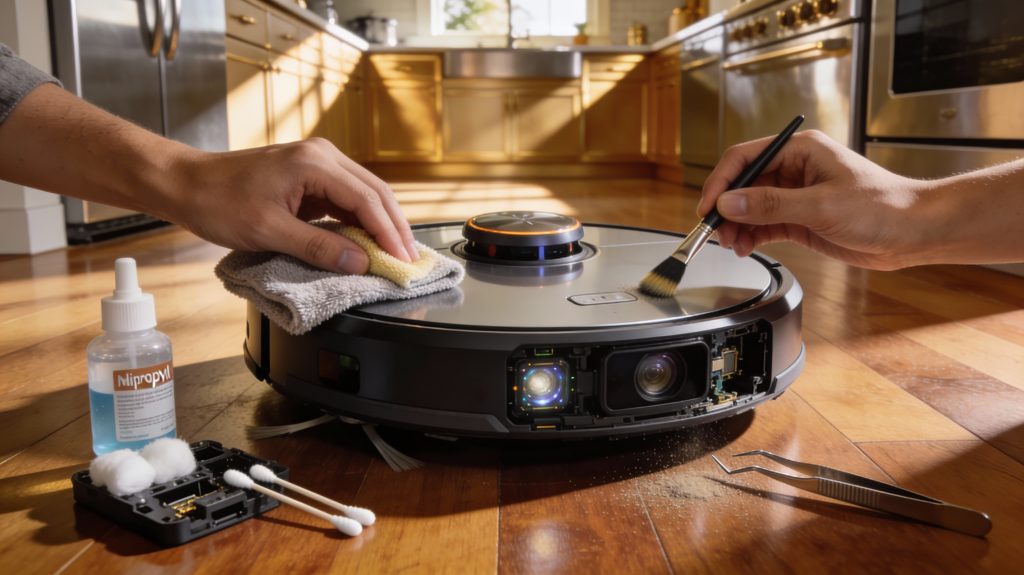
Clean Sensors, Cameras, and Navigation Systems
Meticulous cleaning of robot vacuum sensors, cameras, and navigation systems to ensure precise mapping and obstacle detection in a high-end home.
Accurate navigation depends on clean optical, infrared, and physical sensors. Dust, smudges, or adhesive residue can produce mapping errors, missed rooms, or collisions. Below are focused, practical steps so you can restore reliable mapping without risking misalignment or damage.
How different sensors react to contamination
Cliff sensors (underneath): even a thin film of dust or pet hair can read as an edge and stop the robot from crossing doorways.
IR/wall sensors (side-facing): smudges reduce distance-reading range and cause phantom walls.
Top-facing lidar (LDS) domes or cameras (e.g., Roborock S-series, Neato Botvac, iRobot Roomba i7/i3): dust or fingerprints distort scans and cause map drift.
Bump/contact sensors: sticky residue can make the bumper register false collisions.
What you’ll need
Microfiber lens cloth and a soft lens brush or blower.
Optical lens cleaner or distilled water (check your manual first — avoid ammonia or household cleaners).
Cotton swabs and isopropyl alcohol (70%) for non-coated plastic/metal contacts only.
Tweezers for visible debris.
Step-by-step cleaning sequence of how to your robot vacuum
Power off the robot and remove the battery if your model allows.
Identify sensor locations: underside for cliff sensors, sides for wall/IR sensors, top dome for lidar, and camera windows for visual SLAM systems.
Use a blower or soft brush to remove loose dust from sensors and inside crevices.
Gently wipe optical surfaces with a dry microfiber; if residue remains, use a single lightly dampened cloth with lens cleaner or distilled water. Avoid scrubbing or harsh solvents.
For lidar domes, don’t rotate the mechanism by hand; wipe the outside only. For bumper-mounted sensors, clean around the seam so the bumper moves freely.
Let everything dry fully before reassembling and powering on.
Verification, testing, and logging
Run a short mapping cycle (5–10 minutes) in a familiar area and compare the app’s map to reality. Look for missing rooms, jagged walls, or consistent drift.
Capture before/after screenshots and note date, actions taken, and remaining symptoms. Over time you’ll see patterns—e.g., cliff sensor cleaning correlating with fewer false stops.
Next, you’ll use these verification insights to guide deeper maintenance and targeted troubleshooting in the following section.
6
Deep Maintenance, Troubleshooting, and Long-Term Upkeep Plan
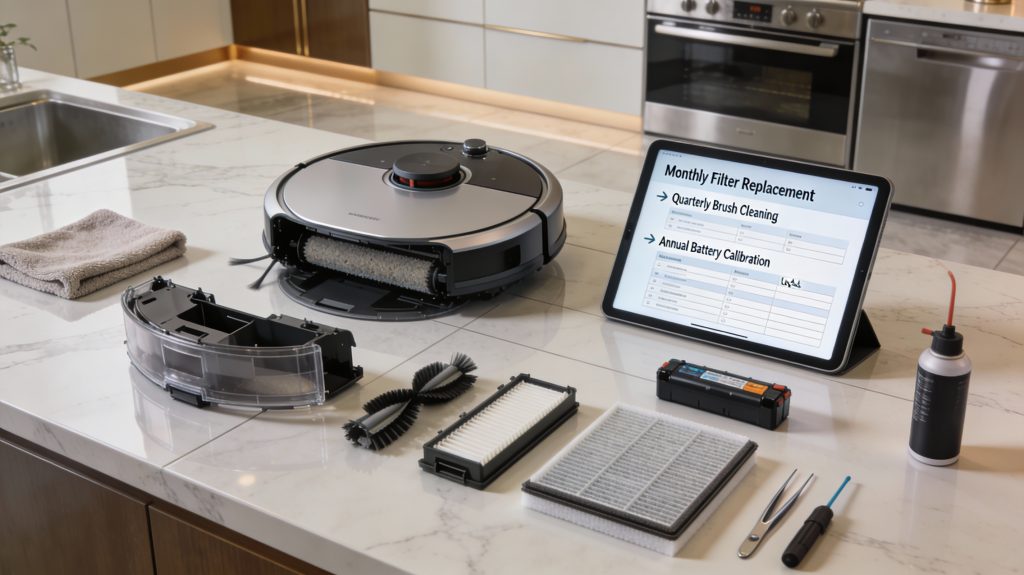
Comprehensive maintenance, troubleshooting, and long-term upkeep plan for a high-end robot vacuum, including filters, brushes, battery, and sensor care.
Monthly and annual maintenance (what to schedule)
Monthly: check and replace foam/HEPA filters if visibly dirty; inspect side brushes and main roller for wear; run a full cleaning cycle and note runtime.
Every 3–6 months: replace filters (common interval), replace side brushes, deep-clean bearings and wheel housings.
Annually: replace main brush/roller if bristles are worn; test battery capacity; update firmware and factory-reset maps if navigation errors persist.
Storage: if you won’t use the robot for >1 month, store it half-charged in a cool, dry place; recharge to 50–60% every 3 months.
(Example: many Roomba i7/S9 and Roborock S7 users report restored suction and 10–20% longer runs after replacing filters and rollers at the 6‑month mark.)
Clean/replace filters and dustbin seals; clear hair from roller; verify brush motor spins freely.
Check for clogged airway or cracked seals. If suction still down >30%, consider replacing the vacuum motor or seek service.
Shortened runtime
Calibrate battery: run full discharge/charge cycle; compare runtime to factory spec (most models 60–120 min).
Reduce heavy-profile modes; if runtime drops >25% vs. spec after calibration, battery replacement is likely.
Abnormal noises
Inspect roller bearings, brush cages, and wheels for trapped debris; remove; lubricate per manual if allowed.
If grinding persists, stop use and contact repair—motor bearings or gearbox may be failing.
Navigation drift or mapping errors
Re-clean sensors and lidar/cameras; update firmware; rebuild map.
If errors persist after resets and firmware, seek professional calibration—faulty SLAM sensors may need replacement.
Maintenance schedule template you can adopt
Weekly: empty bin, quick brush check.
Monthly: filters, wheels, sensor wipe, short mapping run.
Quarterly: replace side brushes, deep-clean rollers, firmware check.
Annually: battery test, replace main brush, professional inspection as needed.
Spare parts, costs, and metrics
Keep on hand: HEPA filter ($10–25), side brushes ($5–15 each), main roller ($15–50), replacement battery ($50–150).
Track metrics: runtime (min), cleaned area per charge (sq ft or m²), suction loss % (compare measured pickup vs. baseline). Log dates and part changes to make data-driven decisions.
Use these checks and logs to decide when DIY fixes suffice and when to seek professional repair or part replacement. Then proceed to final care tips in the Conclusion.
Keep It Clean, Keep It Working
Consistent maintenance keeps your robot vacuum efficient, hygienic, and reliable. By following a short daily routine and scheduling deeper cleans, you minimize performance loss, extend component life, and avoid costly repairs. Empty the bin after heavy use, clean brushes weekly, inspect sensors monthly, and track performance over time to catch any decline early.
Start today — set reminders, track results, and your robot vacuum will reward you with a longer lifespan and consistently cleaner floors. Follow this guide to ensure reliable performance for years to come.